Harbor Breeze fans are reliable but sometimes any part of the fan becomes faulty or stops working which is really concerning. If there’s any problem You’ve to inspect the fan to find which part is causing trouble, the reason behind it, and how to fix it. Then you’ve two choices, either troubleshoot the faulty part or totally replace it, but it totally depends on the type of problem you’re having. In most cases, the problem can be fixed by properly inspecting and troubleshooting the parts, and if it doesn’t work after troubleshooting, then, you’ve to replace the relevant part entirely.
If you’re also facing problems with the Harbor Breeze ceiling fan and seeking help with it then continue to read this article. Here’s a see-through list of what I’m going to discuss in this article:
- The ceiling fan parts that can cause trouble
- What are the signs of a faulty part
- How to fix the issues
- How to prevent these problems ahead(some parts)
- How to replace the faulty parts(if needed)
As you can see, I’ve designed this article to be your one-stop place to get all the information you will need to inspect, troubleshoot, and replace the trouble-causing fan part, so please read on.
Troubleshooting Common Harbor Breeze Ceiling Fans Parts
A ceiling fan is composed of different parts and accessories that are engaged together to work properly. To troubleshoot a ceiling fan, it’s necessary to have a basic knowledge of how the ceiling fan works(also the working of each part separately), and which parts can be replaced. Also, you should know which parts commonly become damaged and which parts are designed rarely or never to fail so you can prevent making mistakes.
Let’s not wait too much and start the procedure of understanding and troubleshooting the fan parts:
Capacitors
The capacitor is an important component of a fan’s motor housing device which stores electrical energy. It is connected to the fan motor helping it to start and also to regulate the motor’s speed so it can operate at different speeds.
There are two capacitors used in a ceiling fan: The start capacitor and the Run capacitor. Start capacitors are used when the fan is first turned on, it helps the motor to start and the Run capacitor is designed to keep the fan running smoothly.
Symptoms of problematic ceiling fan capacitors
When your ceiling fan stops working normally and you don’t know what is causing this problem, then, the first component to look for is the capacitor. I’ve put here the common signs which indicate a faulty capacitor:
- When you switch on the fan, it is not starting.
- The fan starts but moves too slow
- The fan is making noise when running, there can be causes but a bad capacitor is the most expected cause
- The fan starts to wobble(because the capacitor not providing enough power to run smoothly)
These four are the most obvious symptoms of a bad capacitor, and if you’re having any of these, then, you should replace the capacitor as you can troubleshoot it.
How to replace your ceiling fan’s capacitor?
For your assistance, I’m going to explain the step-by-step procedure for replacing the capacitor. For this, you must have the basic technical know-how to ensure a safe and accurate process and if you don’t have the electrical knowledge, then, I would advise you to hire an electrician. But if you prefer doing it yourself, here is an easy guide to this:
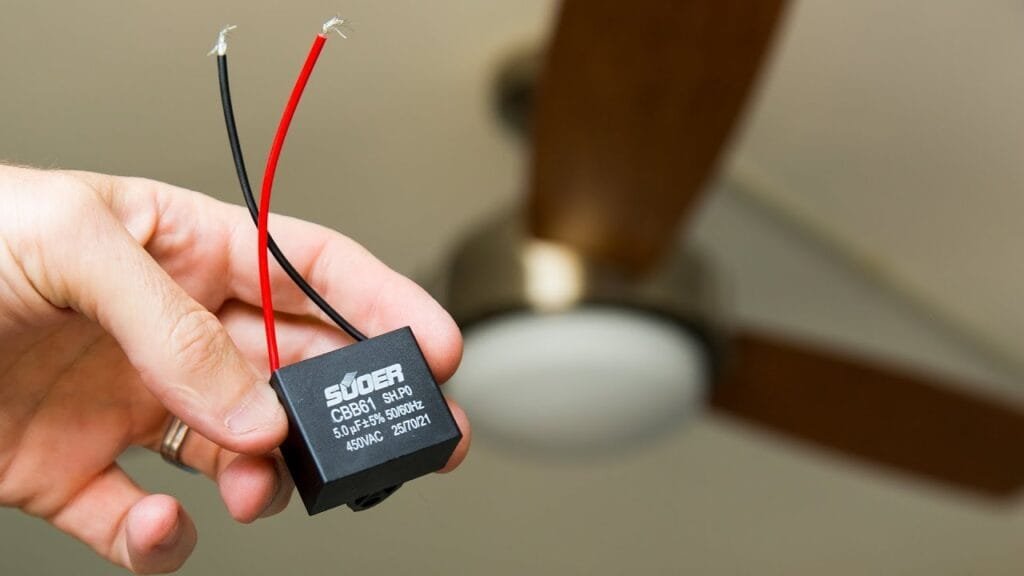
Tools you need:
- A Phillips screwdriver
- A flathead screwdriver
- A voltmeter
- A new capacitor (you can purchase one at a hardware store or online)
Stepwise Instructions:
- Turn off the power to the ceiling fan at the circuit breaker.
- Remove the fan from the ceiling and have it on the plain floor for easy working.
- Separate the blades and motor housing carefully.
- Open the motor housing while keeping in mind the removing process as you’ve to re-connect it later on.
- Remove the screws from the capacitor cover by using a Phillips screwdriver.
- Disconnect the wires from the old capacitor and remove them.
- Use the flathead screwdriver to carefully pry the cover off of the capacitor.
- Be careful not to touch the wires, as they may be live.
- Use the voltmeter to test the old capacitor and check its continuity, In case, it is damaged, it will need to be replaced.
- Install the new capacitor in the same way as the old one is connected to the motor housing.
- Connect the wires to the new capacitor and rejoin the motor housing and then the blades.
- When rejoined, install the fan to the ceiling.
Always remember to wear safety gloves and turn off the circuit breakers to avoid any accidents. If you feel you can’t do it properly then seek help from any electrician which is always best.
Blades
The blades of the ceiling fans can be made up of different materials which include wood, plastic, and plastic and they are responsible to move the air in your space. Most manufacturers use wood as it is durable and cheap, and also provides very chic designs. They are also available in different sizes so can buy them according to your space. It is necessary to choose material and size according to the space and ambiance of your room.
Symptoms of Problematic Ceiling Fan Blades
There are some noticeable signs when the ceiling fan blades become faulty, these symptoms are:
- The fan blades are making a rattling noise
- There is a small gap between the blades and the motor which can cause noise
- The ceiling fan is wobbling excessively
- The blades are bent or damaged
- The ceiling fan isn’t providing as much air as it should
- The blades aren’t moving at all
Fixing Common Ceiling Fan Blade Problems
After inspecting the fan blades, if you notice any of the symptoms stated above, then, see below how to fix these problems:
Case 1: If the blades are making a rattling noise, either the issue is with the capacitor and arm blade or there is something caught between them. If the issue is with the capacitor then replace it as I’ve instructed above, and if the issue is with the arm blades then install a balancing kit to see if it fixes the issue. Lastly, if there is something stuck between the blades, then, check and remove the object which is causing the problem.
Case 2: If the blades of your ceiling fan are bent or damaged, then you must replace the blades. You can easily find replacement blades in hardware stores or online retailers if you know the make and model number of your fan. If you want help with finding the replacement part be sure to read my detailed article on Harbor Breeze Ceiling Fan Replacement Parts, here is the link:
Case 3: If the blades of your ceiling fan are not providing as much air as they should, there is a possibility that they are not properly aligned. Try adjusting the blade pitch, which is the angle of the blades in relation to the motor. You can find the blade pitch adjustment screw on the motor housing. Another cause of it is that the capacitor has gone bad, so be sure to check it too if adjusting the pitch doesn’t work.
Case 4: If the blades of your ceiling fan are not moving at all, the most common cause is that the motor has become faulty. Inspect and replace the motor, but, I would suggest you contact an electrician for help.
Case 5: It is possible that dirt and debris have accumulated on the blades, which is causing the blades to move slowly. It is very important to clean the blades on a regular basis to avoid dust buildup. You can clean it by using a wet cloth or a brush but be sure to turf on the fan to avoid electric shocks.
How to Replace Your Ceiling Fan’s Blades?
If troubleshooting doesn’t work on your faulty blades, then, you should consider replacing the blades. Below, I’ve put an easy stepwise procedure for replacing the blades easily, have a look at this:
Tools You’ll Need:
- A screwdriver
- New matching blades
Stepwise Instructions:
- As you know, start by turning off the power to your ceiling fan at the circuit breaker.
- Remove the fan from the ceiling and have it on the plain floor for easy working.
- Unscrew the blade arms from the motor housing(one at a time). Be careful not to lose the screws.
- Remove the old blades and attach the new ones in their place.
- Screw the blade arms back into place.
- Rejoin the housing and blade arms as they were connected before.
- Turn on the power to your ceiling fan at the circuit breaker box and check if it’s working.
If it’s not working, maybe you have not properly replaced the blades and if so, seek help from an electrician.
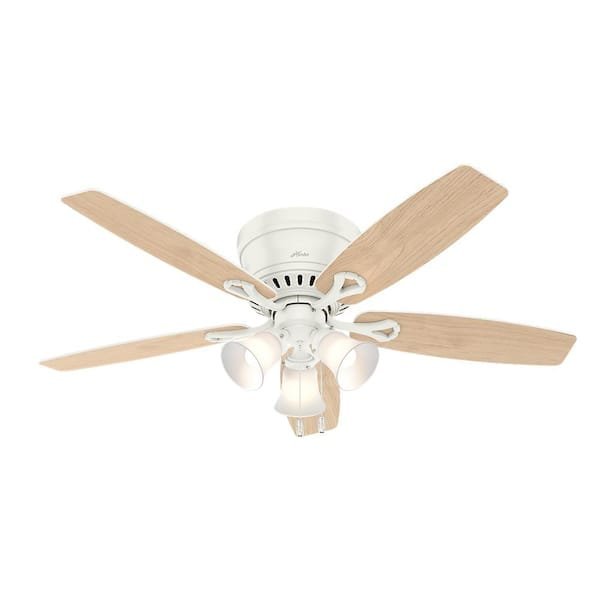
Blade Arms
There are three functions of the blade arms in a ceiling fan including:
- Supports the blades
- Connects the blades with the motor housing
- To provide flexibility to the blades for changing directions
The arms are mostly made up of materials like plastic or hard rubber. The Harbor Breeze blade arms are made of high-quality materials and can support many blade sizes and weights and are designed to be compatible with most ceiling fan models.
NOTE: How to prevent it from being damaged? You can prevent it by regularly cleaning the dirt and debris accumulated on it.
How to find out if the blade arms are faulty?
If your ceiling fan starts to wobble and make strange noises, it can be due to damaged or loose blade arms. Sometimes, the arms may become bent or warped which can cause the blades to rub against the arm and create noise. If you inspect any problem with the blade arms, you should replace them. If you want help with finding the replacement blade arms, be sure to read my detailed article on Harbor Breeze Ceiling Fan Replacement Parts, here is the link:
How to replace your ceiling fan’s blade arms yourself?
Here are the steps to replace the blade arms easily:
- First, turn off the circuit breaker and your ceiling fan.
- Remove the fan from the ceiling and put it on the plain floor to work easily.
- Start to unscrew the screws that are holding the blades.
- After removing the blades, you can now access the blade arms. Remove the old blade arms by unscrewing the mounting screws.
- Now, install the new blade arms by tightly screwing them.
- Reattach the blades to the fan and then the fan to the ceiling and check if it works.
I hope it will be easy for you, but be mindful to use the proper size and type of screws, so as to prevent any difficulty.
Balancing Kits
Even after normal usage, a ceiling fan starts wobbling after some duration. This is because the blades become unbalanced which creates uneven airflow and causes the fan to shake. A balancing kit consists of weights that will help you balance your blades so that they create even airflow and run the fan smoothly again.
How to install/replace your ceiling fan’s balancing kits?
If you need to install the balancing kits on your ceiling fan, here are the steps you need to follow.
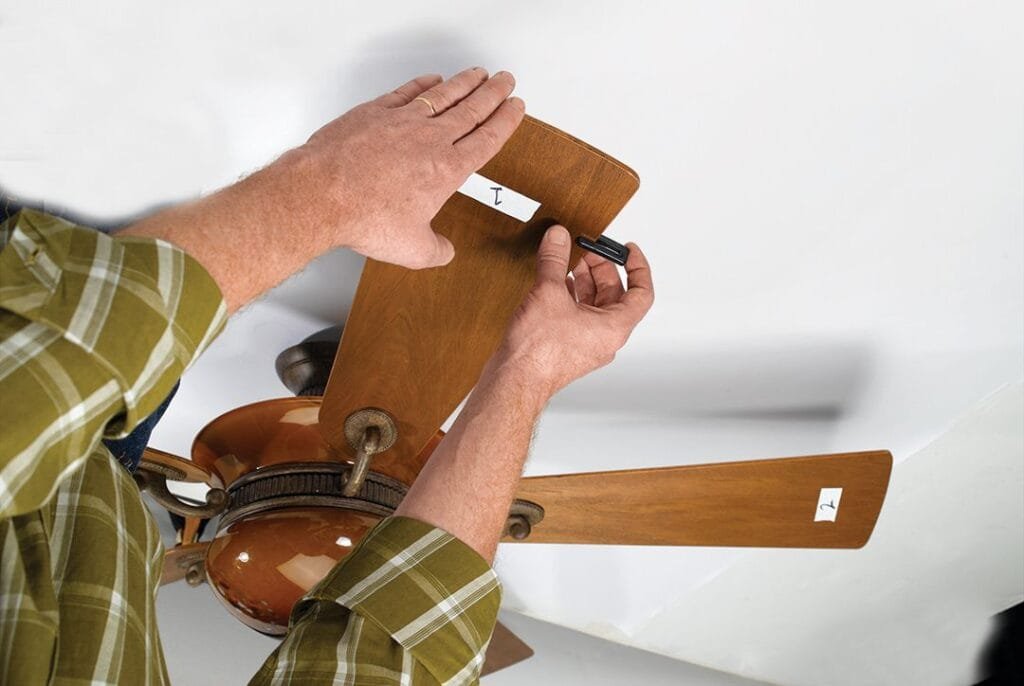
- Turn off the circuit breaker and your ceiling fan.
- Remove the blades from the ceiling fan and when the blades are removed, you will see two small metal loops at the top of each blade(attachment points for the weights).
- Remove the screws from the metal loops using a Phillips screwdriver.
- Attach the weights to the metal loops on each blade. Confirm that the weights are securely attached before moving to the next step.
- Reattach the blades on the ceiling fan and turn on the power.
- Test the ceiling fan to see if it is balanced. If it is not, repeat the steps above until it is balanced.
After installing the balancing kit, if your ceiling fan is still wobbling, go on checking the blade brackets as worn-out brackets can also cause the blades to be unbalanced and create a wobbling effect. And if it is causing the problem try replacing it too. Balancing kits and brackets are easily available at local hardware stores or online retailers. If you can’t find the replacement parts and need help then, read our article which contains in-depth details about Buying Harbor Breeze Ceiling Fan Replacement Parts.
Light Kits
Harbor Breeze includes light kits for most of its ceiling fans to provide their customers airflow and lightning together which helps to save 40% of your home’s energy usage. These light kits are either CFL or LED light kits, where the LED is the best type. When buying a fan that contains a light kit, be sure to check if the bulb used is LED.
Symptoms of Problematic Ceiling Fan Light Kit
There are many signs which indicate a faulty light kit, including:
- The bulb in the fan’s light fixture is not turning on.
- The light kit for the ceiling fan will turn on, but the light is dim, and flickering lights are a cause for concern.
- The bulb is flickering erratically or is dimming periodically.
- When you turn it off, for a few minutes the bulb will not flick off.
How to fix these issues?
If you’re facing the issues stated above, there are a few steps you can take to try and fix these issues yourself:
Case 1: Check the bulb in the ceiling fan’s light kit is screwed in tightly. If the bulb is loose, simply screw it.
Case 2: If the bulb isn’t loose, check the wiring of the light kit. Confirm that all of the wires are connected and there are no loose or exposed wires. If you see any exposed wires, fix them.
How to replace/install a ceiling fan light kit?
If the above suggestions don’t fix the issue, you may need to replace the light kit. Buy a compatible light kit and then it’s best to contact an electrician but if you want to try it yourself then here is how to do it:
- After removing the fan from the ceiling and bringing it to the floor, detach the motor housing and blades.
- Unscrew the light socket from the motor housing and remove the old light bulb.
- Screw the new light socket into the motor housing.
- Attach the new light bulb to the socket.
- Reassemble the ceiling fan and reinstall it to the ceiling.
- Turn on the power at the circuit breaker and test the light kit to confirm it’s working.
If these steps are unclear to you, you can also see the procedure from the manual that comes with your fan and if you’ve lost then search for the manual online by specifying the make and model of your ceiling fan.
Downrods
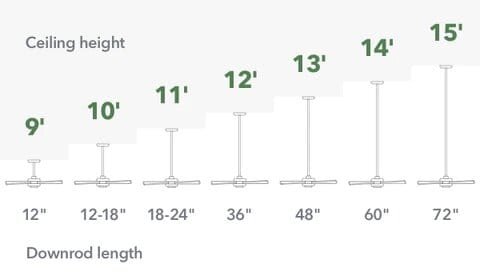
The purpose of a downrod is to connect the ceiling fan’s body to the mounting hardware installed on the ceiling. It allows the ceiling fan to hang at the ideal height to direct the airflow throughout your room. Downrods are available in different lengths so be mindful while selecting the length of the downrod as these are non-adjustable. It depends on the height of the ceiling in your space, for example, if your ceiling is 8 feet or less then you will not need a downrod simply buy a low-profile or flush-mount ceiling fan, and if the ceiling is 9 feet high then you will need a 12-inch downrod. The length of downrod increases as the length of your space’s ceiling increases, so, for your complete guidance in regard to choosing the proper lengths, I’m putting below a picture so you can buy a downrod that fits your ceiling:
How to replace/ install your ceiling fan’s downrod?
There are two scenarios when you need to reinstall or replace the downrod of your ceiling fan, either the installed downrod doesn’t fit the height of your ceiling, or the fan is wobbling because there is something wrong with the downrod. Let’s start the procedure for replacing the downrod:
- First of all, turn the circuit breaker off and put a ladder near the ceiling fan and must have someone on the ground to assist you when you are working.
- Be mindful while working and remember the procedure you’re going through as you have to reinstall the fan.
- Attempt to remove the screws that are connecting the fan’s canopy to the mounting bracket. The canopy will slide down the downrod.
- Test the wires for voltage with a tester and if there’s voltage then recheck the circuit breaker and turn it off properly.
- When you have confirmed that the power is off, remove the wire connectors and separate the wires.
- Lift the ceiling fan to detach it but be careful as it can be heavy and it’s also difficult to handle a fan with its blades still attached. Hand over the fan to your assistant on the ground and step down the ladder.
- Inspect the base of the downrod for a pin and clip system that secures the downrod in place. You will see two or three screws against the rod, loosen them and use needle-nose pliers to remove the clip, and then pull out the pin. Slide off the ball joint of the downrod.
- Take the new downrod and place the ball joint onto it. Insert the metal rod and pull up the ball joint so that the rod fits into its designated slot.
- Threads the wires of the ceiling fan from the bottom of the new downrod. Once the downrod is positioned correctly, put the pin and secure it with the clip. Tight the screws around the base of the down rod.
- Finally, reinstall the fan as it was installed before.
Remote Controls
Nowadays popular ceiling fan brands including Harbor Breeze are providing remote controls with their ceiling fans for the convenience of their customers. These remotes are handy and easy to operate. It has all the basic features; you can change the speed settings, change the direction of spinning, turn on/off and dim/enhance the light fixture, and turn on/off the fan by simply pressing the buttons on it.
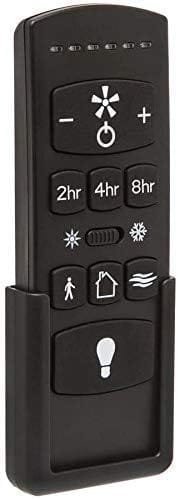
Symptoms and fixes of a problematic ceiling fan remote
There are some telltale symptoms that indicate your fan’s remote has gone bad. These include:
- The fan isn’t responding to the remote
- The remote light stays on
- The fan turns on/off by itself
- The light fixture on the ceiling fan isn’t turning on or off by pressing the buttons
- The fan changes speed or direction erratically
If you’re too having any of the above issues with your Harbor Breeze fan remote, below are the easy fixes to these:
Case 1
When your ceiling fan stops responding to the remote, it can be due to three reasons, including:
- The loose wire inside the receiver unit
- The receiver has gone bad
- The remote needs to reset or synchronize your remote
How to fix:
Start checking the receiver unit for any loose wires, the unit is located inside the motor housing of the fan near the ceiling. Don’t forget to turn off the circuit breaker before starting the work. Make sure that all wirings are in place and securely attached, and if not, proceed to secure all the contacts.
After securing the receiver wirings if the remote still doesn’t work then try to reset and resync the remote control. If you don’t know how to reset or resync then check out my article on “Troubleshooting Harbor Breeze Remote Control”. In the mentioned blog, you’ll find the solutions to all issues with the remotes including, installation, resetting, resynchronizing, etc.
After resetting and re-synchronizing if the remote still not responds then your receiver is burnt out. I hope replacing the remote’s receiver will fix the issue.
Case 2
If the light on your fan’s remote control stays on or the fan changes speed or directions erratically it happens when any of its buttons are stuck in a pressed position. Try to press the buttons again so that they’ll be free from the pressed position. And if doing this doesn’t fixes the issue, then remove the remote’s compartment and check that all the rubber contact of the switches aren’t stuck.
In case these are stuck, try to free them but be careful. Also, clean the contact points using alcohol or white vinegar as dirt and debris cause the buttons to stuck with the switches. If doing this doesn’t fix your issue then you have to buy a replacement remote for your ceiling fan.
If you need suggestions on where to find or buy a replacement remote check out my article: “Harbor Breeze Ceiling Fan Remote Replacement Guide”
Case 3
If the light fixture or the fan has started to turn on or off by itself, or occasionally responding to the remote, then, it is possible that the batteries inside the remote are dead. Replace the old batteries with fresh ones, the Harbor Breeze ceiling fan remotes support an A23 12-volt battery. Some of their fan models also support universal remotes and if you have a universal remote then you will need a AAA or a 9-volt battery.
Pull chains
Many Harbor Breeze ceiling fans come with one or two pull chains hanging down which are designed to change the speed settings of the fan or to on/off the light kit on the fan.
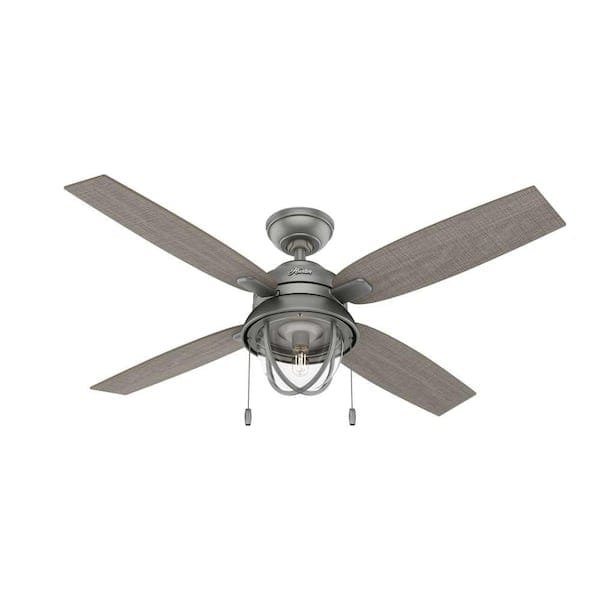
Fixes to problematic pull chains
With usage, the pull chains begin to have issues like it gets broken, jammed, stuck, or tangled. These issues are easy to fix, here is how to tackle these problems:
- If the pull chain is jammed, lubricate it with WD-40 or any other product you would like to use.
- If the chain is tangled, then carefully untangle using a pair of pliers or by hand, whatever is easy for you.
- If the chain is broken, then buy a replacement from online stores or nearby hardware stores.
To guide you thoroughly, I’m adding here a video on how to replace the pull chain on the fan:
Wrapping Up
That’s all! I hope this article will guide you thoroughly. You can also contact Harbor Breeze Customer Service, their representatives will answer all your queries, suggest the best possible solutions, and help you to find replacement parts or will send an electrician to fix the problems with the ceiling fan parts.