The ceiling fans from the Harbor Breeze ceiling fan are reliable, but they require occasional maintenance like all the appliances. Harbor Breeze ceiling fans also include a light kit which is a great addition as it enlightens the room and saves energy costs. But as I said, with usage the appliances need maintenance, and the ceiling fan’s light kit is no exception. It also starts having issues like:
- The light bulb burns out
- The light bulb flickers
- The light bulb doesn’t provide enough lighting, etc.
When the ceiling fan’s light kit starts having the issues stated above, then you must replace the light bulbs in the light kit or the entire light kit itself, depending on the extent of the issue you’re having.
Changing the light bulb or the light kit is not too complex you just need to know the right tips and guide to change it. If you don’t know how to change the light Bulb in the Harbor Breeze Ceiling Fan? Don’t worry, in this blog post, I will tell you the steps of changing a light bulb/light kit in the Harbor Breeze Ceiling Fan. In this guide, I will explain:
- Where and how to find compatible replacement light bulb/ light kit
- What to consider when buying a replacement light bulb/ light kit
- Suggestions on buying the best Harbor Breeze Light Kit Models
- Safety precautions to consider when working with electricity
- Easy step-by-step instructions on changing light bulb/ light kit
So keep reading this full blog post to get all this necessary knowledge!
Where and how to find a compatible replacement light bulb/ light kit for the Harbor Breeze ceiling fan?
When you need a replacement part for your Harbor Breeze ceiling fan, you can get it from the Lowe’s and Litex Industries websites or from the nearby Lowe’s store. You can also buy a replacement light kit from third-party sellers like Amazon and eBay at relatively cheaper prices. But you should read the specifications of the light kit to make sure it will work fine with your Harbor Breeze ceiling fan. You can read the customer reviews and contact the sellers to ask all the queries you’re having. For more information on finding the replacement light kit, read my article: Where to buy Harbor Breeze Ceiling Fan Replacement Parts? In this blog post, you’ll find all the necessary information regarding finding the right replacement for the Harbor Breeze ceiling fan and also the contact information for customer service.
What to consider when buying a replacement light bulb/ light kit for the Harbor Breeze ceiling fan?
Before making the final purchase, you must consider a few things other than compatibility, including:
Type of Bulb
There are three types of bulbs that are used in the ceiling fan’s light fixtures; Incandescent, CFL, and LED. If we compare all three types, CFL and LED are more energy efficient than the incandescent one and LED is much more energy efficient than the CFL bulb. So, the LED bulb will be the best choice but you can also buy a CFL bulb. LED is 75% energy efficient while CFL has 25% energy efficiency, now the choice is up to you. You should consult an electrician if you are unsure what kind of lights work best with your fan.
The Number of Bulbs in the Ceiling Fan’s Light fixture
It is good to check the ceiling fan manual before buying a new lighting fixture. If you’re planning to add more light bulbs, be sure that their combined wattage does not exceed the maximum wattage of the wiring circuit connected to your ceiling fan.
The Type of Fixture
Different ceiling fans have different kinds of light fixtures and thus they require different light bulbs from each other. If you are changing a bulb, make sure that it is compatible with your existing light fixture, otherwise, it will not fit.
Ease of Installation
Usually, LED and CFL bulbs nowadays are being made with easy installation methods. When buying a new light bulb, look at its packaging or ask the seller for more information about the installation methods, its compatibility, etc.
The Lighting Level
It is important to buy the right type of light bulb for your ceiling fan to provide you with enough lighting in a room. The type and color of light emitted from a bulb depends on the bulb’s color temperature. The color temperature is important to consider because it affects the tone and brightness of the light.
The lighting level is measured in lumens and is usually specified in the fan’s manual. If you have dimmer switches in your house, I’ll advise you to buy LED or CFL bulbs with low wattages (i.e., less than 60 watts). It will not only prevent glare but also emit a cozy and warm light.
Efficient Energy Rating
It is also an important factor to consider as the higher the energy-efficient rating, the more it will save energy costs. LED bulbs are more energy-efficient and long-lasting than other types of light bulbs. They provide good brightness levels without creating too much heat.
Some Suggested Harbor Breeze Light Kit Replacement Models
Now I’m suggesting the best light kit models from the Harbor Breeze that you can buy for replacement. I’ll tell you the specifications and prices for each of the light kits below:
Harbor Breeze 10-inch 4-Light LED Ceiling Fan Light Kit
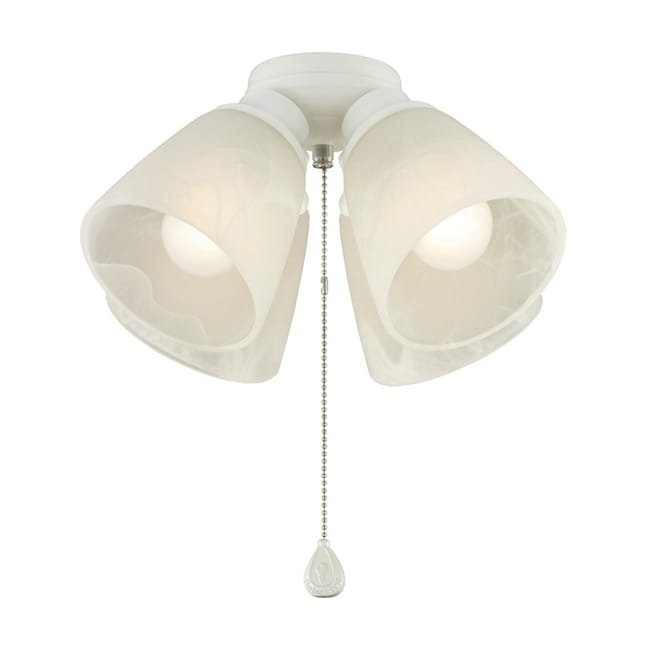
It is available in four finishes including; white, brushed nickel, matte black, and polished brass. You have the choice to choose the finish that matches your ceiling fan’s finish and room’s decor. Its current price mentioned on Lowe’s official website is $41.78, It also includes the bulbs in the package, so is quite affordable. It is also easy to install and is damp-rated meaning that you can install it in outdoor places as well. Some necessary specifications are in the table below:
| Shade Color | Alabaster |
| Bulb Type | LED |
| Number of Bulbs Required | 4 |
| Maximum Bulb Wattage | 40 |
| Wattage Equivalent | 50 |
| Light Bulb Base Type | Medium base (E-26) |
| Recommended Light Bulb Shape | A15 |
| Warranty | 2-year limited |
| Safety Listing | SGS safety listing |
Harbor Breeze 8-in 2-Light LED Ceiling Fan Light Kit
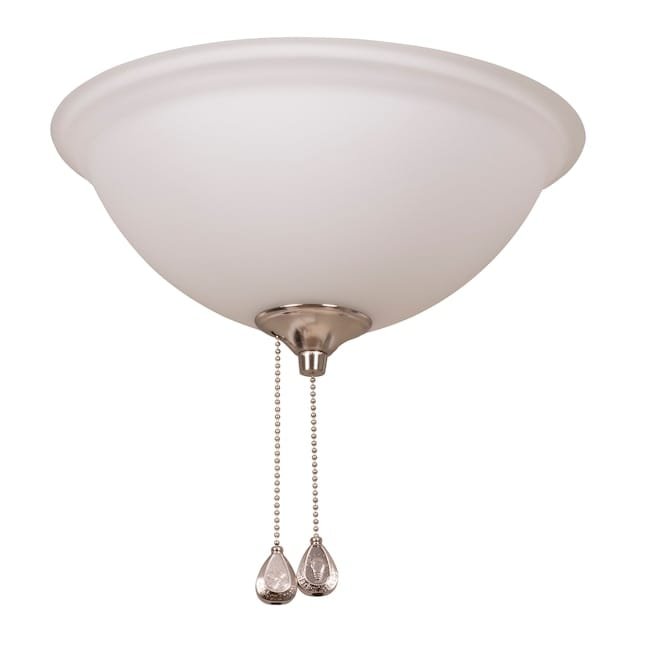
It is available in four finishes: brass, bronze, brushed nickel, and white. Its current price mentioned on Lowe’s official website is $52.78. The bulbs are also included in the packaging. It is easy to install and is not damp rated meaning that you cannot install it in outdoor places. Some necessary specifications are in the table below:
| Shade Color | Frosted Case White |
| Bulb Type | LED |
| Number of Bulbs Required | 2 |
| Maximum Bulb Wattage | 6.5 |
| Wattage Equivalent | 0 |
| Light Bulb Base Type | Medium base (E-26) |
| Recommended Light Bulb Shape | A15 |
| Warranty | Limited lifetime |
| Safety Listing | ETL safety listing |
Harbor Breeze 11-in 3-Light LED Ceiling Fan Light Kit
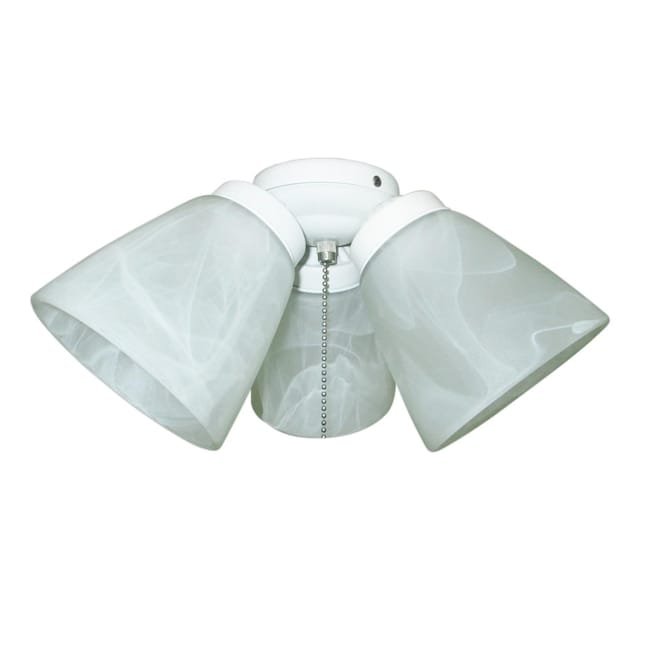
It is available in white finish only. Its current price on Lowe’s website is $52.78. It is made for use in outdoor locations such as patios or porches. The necessary specifications are:
| Shade Color | Alabaster |
| Bulb Type | LED |
| Number of Bulbs Required | 3 |
| Maximum Bulb Wattage | 6.5 |
| Wattage Equivalent | 120 |
| Light Bulb Base Type | Medium base (E-26) |
| Warranty | 1-year limited |
| Safety Listing | UL safety listing |
Harbor Breeze Calera 10.25-in 1-Light LED Ceiling Fan Light Kit
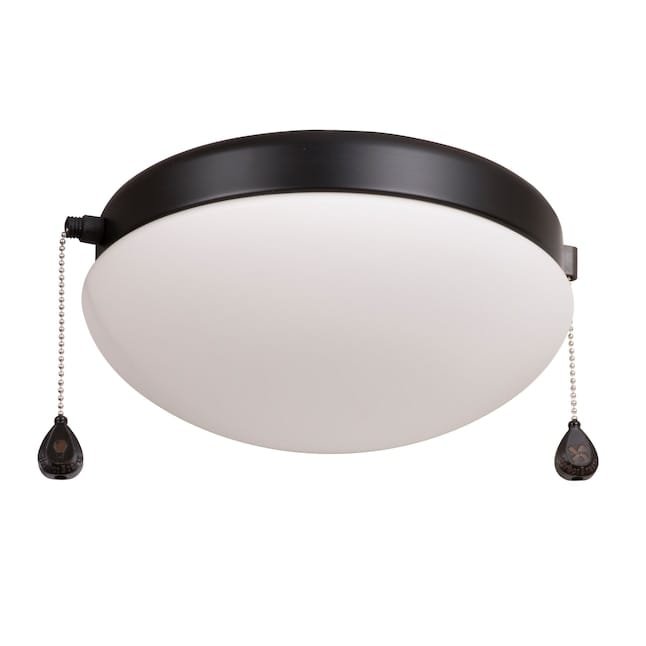
It is available in two finishes; bronze, and brass. Its current price at Lowe’s is $54.98. It can be used in both indoor as well as outdoor locations. The necessary specifications are:
| Shade Color | Matte opal |
| Bulb Type | LED |
| Number of Bulbs Required | 1 |
| Maximum Bulb Wattage | 13 |
| Wattage Equivalent | 75 |
| Light Bulb Base Type | Medium base (E-26) |
| Recommended Light Bulb Shape | A15 |
| Warranty | 1-year limited |
| Safety Listing | ETL safety listing |
Harbor Breeze Tilghman II 11-in 2-Light LED Ceiling Fan Light Kit
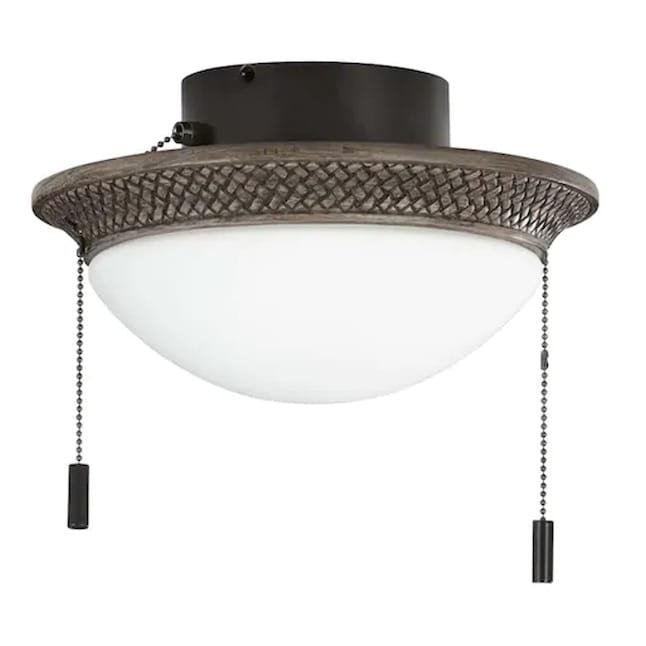
It is available in two finishes; white, and bronze. It looks perfect with the Harbor Breeze Tilghman ceiling fan model. It has two bulbs inside the globe and can be used in both indoor and outdoor places. Its current price is $54.98. The necessary specifications are:
| Shade Color | White frost |
| Bulb Type | LED |
| Number of Bulbs Required | 2 |
| Maximum Bulb Wattage | 6.5 |
| Wattage Equivalent | 120 |
| Light Bulb Base Type | Medium base (E-26) |
| Recommended Light Bulb Shape | A15 |
| Warranty | 1-year limited |
| Safety Listing | UL safety listing |
So, these are some light kits from Harbor Breeze that I would recommend you buy. These all are the best sellers, easy to install, and compatible with most Harbor Breeze ceiling fan models.
Safety Precautions To Keep In Mind When Changing a Light Kit/Bulb
Before you start changing the light kit or the light bulb, it is important to consider some safety precautions to avoid damage and accidents. Here are the important safety precautions you must not forget when changing the light kit/bulb:
Use a Sturdy Ladder
Instead of using chairs and tables, you must use a sturdy ladder that is tall enough to reach the light kit to avoid falling.
Wear Gloves
The bulbs become hot when running. It is wise to wear gloves to avoid cuts and burns when changing the burnt-out bulbs.
Removing the Old Bulb
When you’re removing the old bulb, handle it carefully to avoid dropping and breaking it. If the bulb is hot, don’t rush to hold and remove it, instead, wait for it to cool down and then attempt to remove it.
Use the Correct Size Bulb
Always check the specifications to make sure you are using the correct size bulb as specified in your Harbor Breeze ceiling fan manual. If you install a bulb of the wrong size, it can be dangerous and can damage the light kit.
Handle the New Bulb with Care
When installing the bulb into the socket, handle the bulb with care to avoid breaking it. Don’t touch the bulb’s glass surface with your bare hands, as the natural oils from your skin can cause premature bulb burnout.
Check the Wiring
It is important to check the wiring in the light kit to make sure that it is properly connected before starting to install the bulb. If you see any loose or damaged wiring, refix it or replace it if needed, before installing the bulb.
These are some safety considerations and precautions you must follow when changing a light bulb in your Harbor Breeze ceiling fan to complete your task safely and effectively.
How To Install a Light Kit On Harbor Breeze Ceiling Fan?
Installing the light kit is not as difficult as you think, but you’ll need the basic electrical know-how and a proper stepwise guide to take out the replacement process. Here I’m proposing an easy stepwise guide to help you out:
- Step up the ladder and locate the fan’s housing assembly, typically located at the center of the ceiling fan.
- It includes two wires to connect the light kit and is usually covered with some decorative plate. Remove the cover using a screwdriver to reveal the assembly and access the wiring.
- Take the new light kit, unbox all the parts, and make sure all of the parts are included.
- Now you can attach the new light kit to the housing assembly on the fan.
- Unwrap the wires on the light kit and pull them out. If the kit includes a nut and washer, remove them and set them aside.
- Identify the wires coming out of the fan’s housing assembly, There will be two wires; white (the neutral wire) and black (the hot wire). Connect the light kit’s white wire to the fan’s white wire, similarly, black to the black wire. Here’s one thing important to note the hot wire can be of other colors, so check the user manual of your ceiling fan.
- Insert the wires into the housing assembly and then connect the light kit to the assembly with your screwdriver and the screws that you’ve removed to detach the cover.
- After completing the wiring, insert and screw in the light bulbs that are included with your light kit.
- If the kit includes, attach globe/ light kit cover and fan pull chains.
Test your newly installed light kit and the fan by turning on the power at the circuit breaker and at the switch.
How to Install a Harbor Breeze Light Kit Socket?
Installing a light kit socket in Harbor Breeze ceiling fansvery easy task that requires only basic electrical knowledge and proper guidance to complete the task. The necessary tools you’ll need to accomplish this task are:
Phillips screwdriver, Wire cutters/strippers, Crescent wrench, Needle nose pliers, Ladder, Harbor Breeze light kit socket, Light bulb (the same wattage as the one that came with the original light kit).
Step-wise Instructions:
- Turn off the power to the ceiling fan from the circuit breaker box and test the fan to make sure that it is not getting power.
- Use a Phillips screwdriver to remove the screws from the decorative plate(globe) at the bottom of the fan. Pull down on the plate to remove it.
- Locate the screws holding the wire harness in place on the top of the motor housing. Usually, it has three screws, remove the screws with the screwdriver and take off the wire harness from the motor housing.
- Using wire cutters cut the wires connected to the old socket. If the wires are wrapped around terminal screws, loose the screws with a crescent wrench and then pull the wires off.
- Install the new socket in the ceiling fan by screwing the socket into place and then twisting it on a decorative globe.
- Thread the new light bulb into the socket.
- Reattach the wire harness to the motor housing using the screws, same as you removed in Step 3.
- Put the globe back in place at the bottom of the fan and screw it in place.
- After installing the bulbs and globe, turn on the power to the ceiling fan and check to see if it works.
If the new light bulb is working, then remove the cover globe and check to see if the bulbs are screwed in properly. Also, don’t forget to make sure that the wires are properly connected to the socket.
How to Change Light Bulb in Harbor Breeze Ceiling Fan?
It’s important to replace the bulb, if the bulb has broken as there are exposed wires, someone could easily get electrocuted. Additionally, a broken light bulb can cause the ceiling fan to overheat, which can cause fire. The burnt-out or broken also impacts the normal function of the ceiling fan. If you find a broken or burnt-out bulb in your fan’s light replace it as soon as possible, here is how to remove and replace the bulbs:
Step 1: Make Sure Your Light Has Actually Burned Out
Before going through the hassle of removing the bulb, make sure that it is actually burnt out and needs replacing. The easiest way to check if the bulb is burned out is: simply unscrew it and screw it back in. If the light turns on, then the problem isn’t with the bulb.
Step 3: Take Your Fan Off the Ceiling or Get a Step Ladder
If you can reach the cover or glass globe surrounding the light bulbs, then you can proceed to the process but, if not, remove your fan from the ceiling so that you can work on the floor easily. Alternatively, you can use a step ladder to reach the fan. I recommend using a step ladder as taking off a ceiling fan is quite difficult.
Step 4: Find the Light Bulb Cover and Unscrew It
After setting the ladder on a flat surface and stepping up the ladder, the next thing is to remove the light kit’s globe or cover. Here is how to do it:
Use both hands to grab the light cover, place your thumbs on the middle of the cover, and twist it to the left (anticlockwise). The light cover will come off instantly, if not, you might need to put a little extra force if it feels stuck at first.
Don’t worry about applying force, as these light covers or globes are very sturdy and can endure a considerable amount of pressure. After you remove the light cover, set it down on a flat surface. If the light looks dull, clean the cover to make the light look brighter.
Step 5: Remove the Old Light Bulb
After removing the globe, you have now access to the light socket. You can remove the old light bulb, to do this, hold the base of the light bulb (the part that doesn’t screw in) and twist it to the left (anticlockwise). Usually, the light bulb comes out easily, if the bulb is stuck, you can try wiggling it back and forth until it comes loose.
Step 6: Insert The New Bulb
Hold the base of the new bulb and screw it into the socket in a clockwise direction. Make sure the new bulb is screwed in tight so that it doesn’t come loose.
Step 7: Put The Cover Back On
After installing the new bulb is in place, it’s time to put the cover back on. Simply grab the cover with both hands and screw it on in a clockwise direction. Make sure the cover is screwed on tightly so that it doesn’t come loose.
After completing the task, you should test the new light bulb to be sure no further work is needed.
Summary
In this guide, I’ve tried my best to help you find the best replacement light kit for your Harbor Breeze ceiling fan. In addition, I’ve also suggested some official Harbor Breeze light kit models to help you buy the replacement. I hope you will find the installation process for the light kit, the bulb socket, and the bulb easy and helpful.